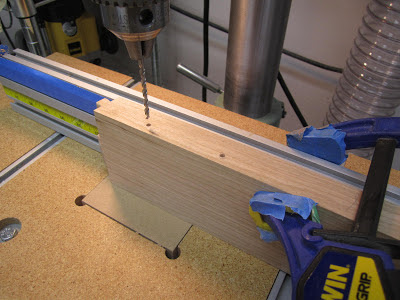
While trying to decide whether or not to fit the arm before or after gluing up the sides, I decided to knock out some details required before any glue up. The advantage of gluing before fitting the arms is that I will have a more firm foundation for fitting, and, in general, is preferably better. However, I may want to cut the front spline mortises using a router table. In this case, I need to fit the arms before glue up, dis-assemble, then route the splines.
Anyway, here I am preparing the bracket details that will go under the front/side rails. I do not need to shape the brackets at this time, but I need to do the joinery before glue up.
In the pictures above I drilled a 1/4" hole. I am transferring the hole location to the leg using a dowel center doohickee. In the Blacker House arm chair I actually cut little mortises. However, here I will use a dowel. Then I drill 1/4" holes into the legs where I marked the locations. Since side brackets hit the front legs at an angle, I cut a shim with the correct angle for drilling:
Now, the brackets attach to the rails via screws. After preparing a hole with a forstner bit and a brad point (drilling a clearance hole), I take the bracket to the bench, clamp, then mark the hole locations on the bottom of the rails using the same brad point. I will later drill into the rails at those locations using a smaller brad point appropriate for my screws.
Done with the brackets for now.
Next I prepare the leg indents at the bottom of the legs. Now, the leg indents from a distance appear to be simple ramps, so to speak. A router jig works well in cutting the ramp. This is what I did for the Blacker House arm chair. However, later I discovered that the leg indents are actually pillowed, with the sides carved. So, I decided to go authentic with this detail:
I scribe around the detail, going heavy at the sides leaving extra wood at this point. I know I cannot carve a straight line. It will be caddy wampus by the time I finish carving it - and caddy wampus here looks really bad. We want those sides to be straight. If the pillow has slight carving undulations, that is fine and actually adds to the texture of the piece, but caddy wampus sides does not. Scribing here helps prevent wood fibers tearing out beyond my layout lines while carving
I made a scratch stock, thinking that this would be enough. However, I had a difficult time getting the depth and finish I wanted. Consequently, I use the scratch stock to hog out much of the sides...
I remove some material at the corners, going heavy. Then I use a double beveled angled chisel to carve the sides. The scratch stock gave me a nice ramp against which I can ride the chisel, and the double beveled chisel allows for much more control of the depth than a straight flat chisel which can easily get caught in a specific direction and go too far.
I go down about an 1/8". I then chop the end and then round it over with a back bent gouge
Next I use a marking gauge to slice a clean and straight shoulder and then I pick out the goobers with a chisel and small scraper.
After chiseling the corners I then clean everything up with some sand paper. I had some tear out here and there where the grain got funky. 120 grit took care of that just fine.
Note that this is the back leg which is pretty wide. The narrow legs on the Blacker House chair would accentuate the pillow detail quite a bit more. I think this detail is very nice when carved! However, to be honest, the straight ramp also looks very nice. From a distance one is hard pressed to tell the difference. I'm thinking that the original craftsmen wanted the leg to look ramped but carved it as such since the affect is very similar and, given the hand tools, does not require nearly as much wood removal.
Ok, time for some repair. On one of the legs I got overly exuberant and took the chisel beyond the edge. Be wary of listening to Stevie Ray Vaughan play the blues while attempting delicate carving!
I took a 7-4 chisel and carved a small chip. Then I took the same chisel and scooped out the errant gash, making a bigger gash.
Because I used the same chisel sweep, the chip and the new gash have matching profiles.


Great site: enjoy the views of how the furniture
ReplyDeleteis designed and made. Hope to
purchase in the furture.
I plan to make a sanding box that sucks engraved plaques the dust away in my workshop.
ReplyDelete