Pages

Monday, December 30, 2013

Greene & Greene Blacker House Office Chair (Splats) - Part IX

Back to the splats.  Its time for the cool inlay.  Here is what the inlay will look like.


I will cut and inlay the stems first.  The stems are white oak.  I place a piece of white oak under the trace paper along with some carbon paper and use a small wood dowel sharpened at one end to trace the pattern to the oak.  I then use a fret saw to cut the pattern, trying to maintain a 90 degree edge.  I then take a small file to clean as well as bevel the edge.  The bevel will ensure a tight fit later.  The trick is not to file the fingers!


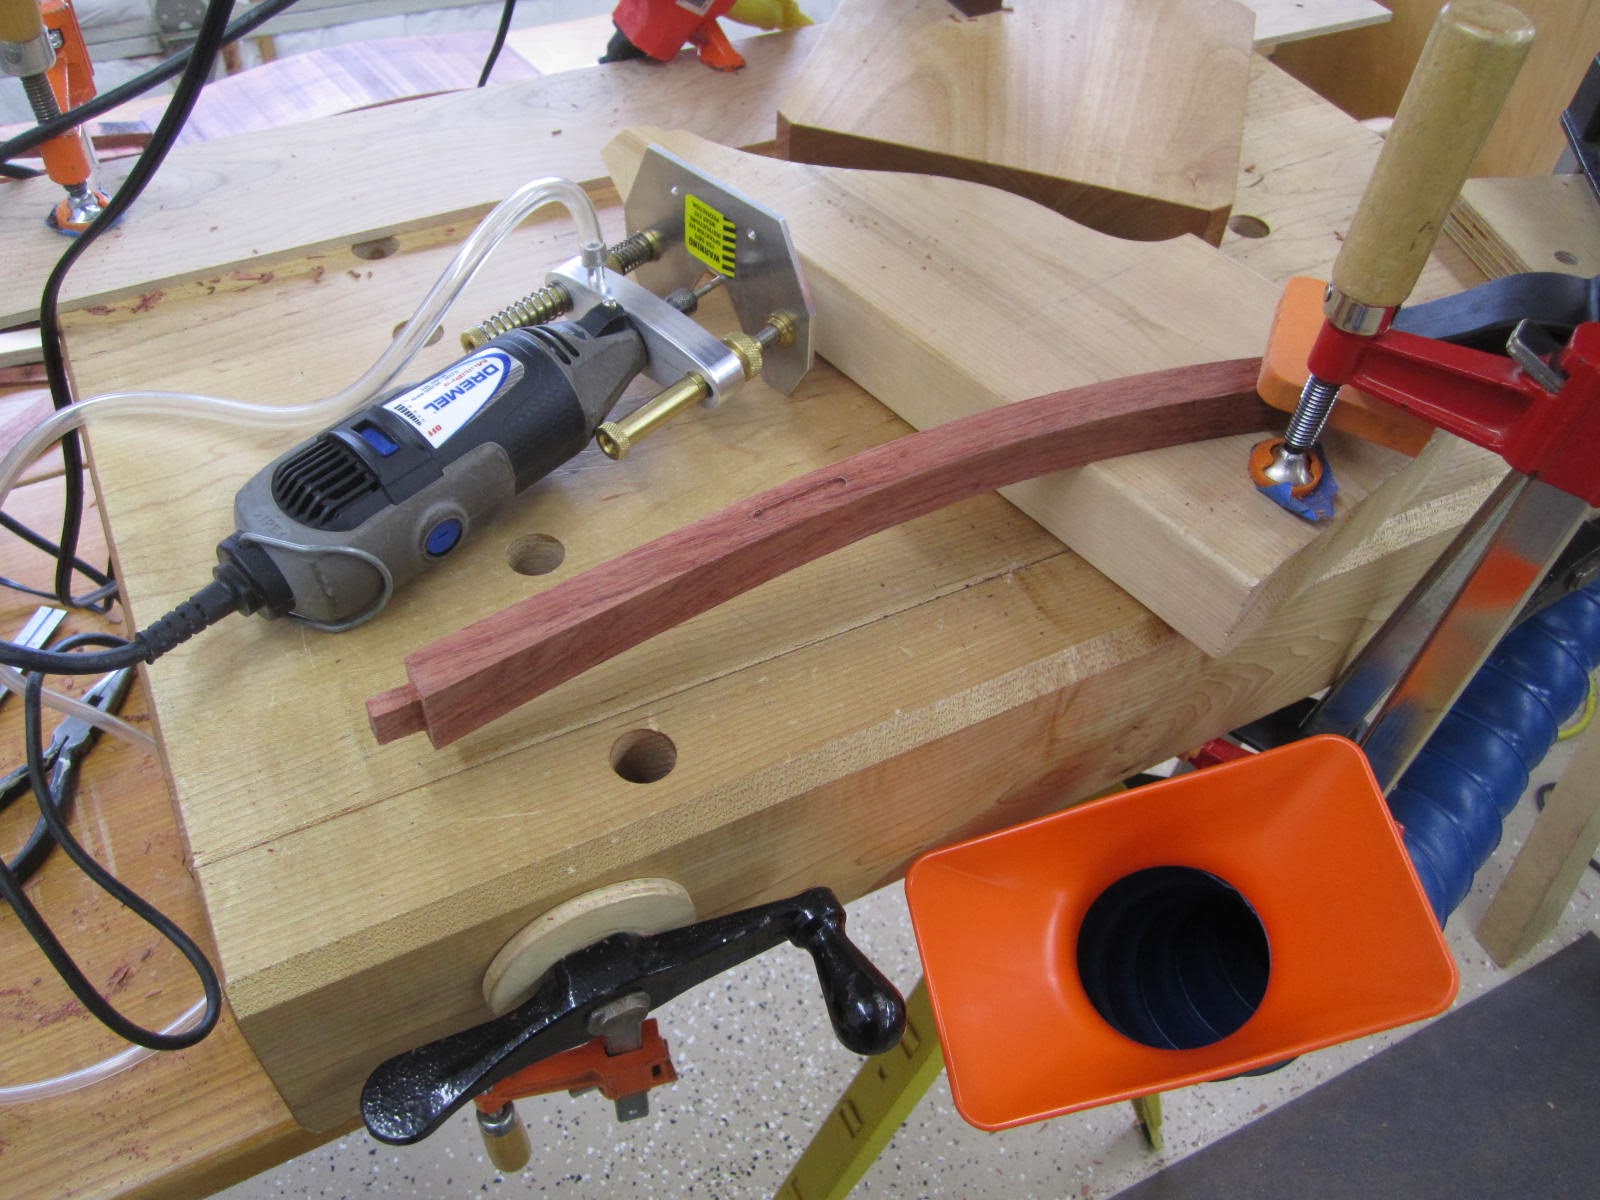
The center splat has a fairly pronounced curve where these stems will go.  I cannot simply bend these stems to the curve without risk of splitting.  Consequently, I will dry bend these stems around a hot pipe nipple.  Normally, bending kiln dried wood is a no-no.  However, I am not bending too much here.  Works like a charm.


I then apply double stick tape to the bottom and position the stem on the splat.  I prefer to use a surgeon scalpel rather than a hobby knife.  The scalpel is a lot stiffer but just as sharp.  Since these stems are so narrow I need to be careful and not push too hard against the stem which may reposition the stem and mess up my scribe line.  Some folks use hobby glue to secure small pieces.  Then they use acetone to clean the area up.  I have not tried this technique.  I'm not a fan of acetone so I've been reluctant.


Once it is traced I route the pattern with a dremel and a carbide downcut spiral bit purchased from www.stewmac.com:


I use the scalpel with an older blade to clean out the tight corners at the bottoms.  Now I glue them in!


Here is what they look like after hand planing.  The edges are nice and tight because I had beveled the sides of the stems.  Nonetheless, there are about 2-3 small gaps here and there.  I use a toothpick and place a small dab of glue in the gap.  I then sand the area with 220 grit sandpaper.  The dust mixes with the glue and fills the gap.  I then follow with a damp cloth to clean the surrounding area.  Works great for small gaps.


Now it's time for the tulips.  I believe the original Blacker House arm chair used purple heart for the tulips. Since bubinga is quite red I decided to use walnut instead for better contrast.  Here I am in the process of cutting one of the tulips:


These rascals are pretty small and difficult to handle.  After a couple attempts I try leaving the tulip connected to the waste wood for a better grip.  This allows me to clean and bevel most of the edge without filing my finger tips!


As with the stems I use double stick tape as a backing and a scalpel knife to trace the pattern followed with the dremel and small carbide downcut spiral bit.  Another thing I forgot to mention.  I wear an optivisor to see what I am doing.  With an optivisor I can literally kiss the line with the bit and see the scribe line flake away.  I've got total control here.


Here I found that a small 2/3 carving chisel works well for cleaning the corners.


Holy tulips, those hands are dry!  The weather has been cold and dry here in southern Oregon.


I will not install the tulips yet.  Because they will remain slightly proud to the surface I will install the silver specs below the stems first - I don't want the proud tulips to interfere with the silver inlay process.  I am using argentium silver wire.  I use a small hammer to flatten the wire a bit.


I then snip them to the desired length using electrical wire cutters.  Then I position the small piece of silver at the desired location.  Then I vigorously tap the small wire.  I do not bounce the hammer as the piece will then go flying.  I hammer down and leave it positioned on the silver.  The goal is to create a small dent in the wood.  I'm using a hammer that has a pillowed surface on one side which greatly reduces the chance of dinging the surrounding wood.


Here are all the indents highlighted with a pencil.  Needless to say, it's also important to keep track of which silver piece goes where.


Now I clean the area out with a dremel.  Note the small carbide downcut spiral bit.  This one is pretty small and works great for this task.


The silver still doesn't quite fit.  However, I can get the silver seated pretty well which allows me to use the scalpel to expand the edges as necessary:


Once fitted I place a small dab of gel super glue in the hole and press the silver in.  I may lightly tap with a hammer as well.  Some of the super glue may ooze out.  I find that the gel stuff is much easier to work with as it does not penetrate so deep in the wood - it cleans up easily later with sandpaper.


I use 220 grit sand paper to round over the silver.  I simply sand the entire are with the sandpaper, working the edges and corners of the silver good.  Silver dust will get in the wood.  However, a vacuum and wet toothbrush cleans the surrounding wood fine.  Then I tape around the silver and use 600 grit sandpaper for polishing.  I do not want this sand paper to hit the wood.  It will burnish the wood which will be very noticeable, especially after the finish is applied.  One could go to higher grits for polishing.  However, I think the 600 grit looks pretty good so I call it quits.


Now I finally install the tulips.  I clean the glue off immediately with a damp cloth and toothbrush.  Generally speaking, I'm one to clean glue up immediately.   I plane the tulips down with a hand plane leaving them proud a light 1/32.  I follow with 220 grit sand paper to round over the edges to give them a pillowed surface.  Once again, there were 1-2 small gaps here and there.  I placed a small dab of glue in the gap and sanded the area to fill in the gap, followed with a damp cloth.


Now its time to glue the back together!  I'll do that in the next post.

Tuesday, December 24, 2013

Greene & Greene Blacker House Office Chair (Splats) - Part VIII

  
Merry Christmas and Happy Holidays!

The splats for this chair definitely take some time.  After getting the splats fitted and shaped we now need to spruce them up a bit with some classic Greene & Greene pizazz.  We'll do the tabs first.

Based on my drawing, I locate with a knife and small square the top and bottom of each tab mortise - 16 mortises in all.  These mortises are 1/4" wide and 1 1/8" long for the 4 inner tabs and 1 1/4" long for the 4 outer tabs.  The tabs are recessed 3/16" from the front face of the splat.  Because the sides of the splats are all curvy without a good reference edge I find that the handy mortise marking device shown below works well - two thin strips of wood secured on each end to give me a 1/4" width space for marking out the mortise with a knife.  I clamp the top and bottom of the jig to the side of the splat and use a marking knife to scribe the sides of the mortise.  I start with the large splat first.


I chopped the first mortise by hand but then quickly decided to use the dremel with a small 1/8" downcut spiral bit for the remaining 15 mortises (purchased from www.stewmac.com).  I'm going about 1/4" deep here as I recall:


I make the tabs with a bandsaw and run them through the small drum sander to the desired thickness and hand plane the edges for final width.  However, they are kept extra long for now.  I'll adjust the length later.


Here I've got the 4 inner tabs fitted to the large inner splat:


Now we need to fit these tabs to the adjacent small splats. I've got the top and bottom locations of the mortises marked out on the small splat.  However, I do not know exactly where they will line up length wise.  Consequently, I install the small splats and use the tabs directly to locate the mortise locations.  I first clamp the top to make sure the splats are properly lined up:


I make sure that I am about 3/16" from the front.  I use a pencil to locate the mortise.  I then line up my mortise jig and use a knife to scribe the mortise location:


I follow this process (which does take some time) till we get all the tabs fitted.  The tabs need to be cut length wise for the final fit.  Oh yes, for the 2 small splats that have tabs on both sides I go only about 3/16" deep with the mortise so as not to weaken the splat.

Here are what the tabs look like in their final state:


And here is what they look like installed:


Now its time to work on the negative spaces.  As I've mentioned before, the Greene brothers were masters with the use of negative space - which is just as important as the space occupied by the wood.

Here I am hogging out some material with the drill press:


Then I use the chisel to clean the edges:


For the two squigglies I use the dremel and a file:


I'll show the inlay process in a separate post as there are a lot of photos in that.

Monday, December 16, 2013

Greene & Greene Blacker House Office Chair (Splats) - Part VII

This is going to be a pretty long post - so hang on to your britches!  The splat design for this chair is pretty much the same as the Blacker House arm chair:


The dimensions are different as this chair has a larger and bolder back.  In a nutshell, lots of angles!  Here are the splats in their unadulterated state:


Here's the same lumber on their sides:


First thing to note.  We will be hogging off a lot of wood to get our final shapes.  Second, as we see above in the side profile photo, there is very little wiggle room to obtain our side profiles with the 8/4 lumber.

Given all the wood that must be removed one can see why bent lamination and steam bending is popular.  Bent lamination alleviates the need for extra thick wood and allows for very curvy lumbar shapes.   I probably would have tried bent lamination but I wasn't sure how all the inlay and negative space would look.  As for steam bending, well, almost all tropical woods are kiln dried which, according to experts, is not good.  Consequently, I decided to stay with solid 8/4 lumber for the splats.  Nonetheless, as I'm laboring over the effort to remove so much wood I'm thinking that bent lamination may be a valid alternative here.

The mortises for the splats in the rear rail are inline to each other.  Also, the mortises in the crest rail are also inline to each other.  This makes life a bit easier (with the Blacker House arm chair the mortises were not inline but followed an arc).  Consequently, I can determine my tenon angles for all the splats by measuring just one of the crest rail / rear rail mortise pairs.

I install a floating tenon in the crest rail mortise and another one in the rear rail mortise.  Then I glue on a stick of plywood.  This allows me to determine the angle relationship between the two mortises which should be the same for all mortise pairs.  Another thing I do is I glue on a small piece of wood to the back of both floating tenons to locate the shoulder locations.


Next I draw the side profile onto one of the splats.  This tells me where the tenons must go.  I then clamp the tenon template onto the side of the splat making sure that the floating tenons line up properly with the drawing.  I've determined that my reference edge for these splats will be the back - which has been surfaced flat.  I clamp the whole assembly against a true 90 degree surface with the back against the 90 degree surface.


Now I take one of the bevel gauges and determine the bottom tenon angle:


Leaving the tenon template securely clamped to the wood, I unclamp the assembly from the 90 degree surface and carefully rotate the entire assembly and reclamp to the 90 degree surface so I can measure the top tenon angle with my second bevel gauge (the back of the splat is still clamped against the 90 degree surface).   Now we are in business!  Oh yes, remember that small piece of wood glued to the back of the floating tenons?  I use those to mark out my shoulder locations.

My original design called for all the splats to be flush with the front of the crest rail.  Needless to say, flushing the splats requires that the fit be perfect.  Here is an example chair I built a couple years ago where the splat is flush:


Because this chair has 5 splats I decided to make my life easier here and recess the splats a light 1/8" from the crest rail surface which is actually in spirit of the original Greene & Greene style.  Recessing the splats allows me to house the tenons in the crest rail which makes fitting a LOT easier.  No fussing around trying to get the top splat shoulders perfectly flush with the crest rail.  A housed tenon means that the splat shoulders are actually recessed into the bottom of the crest rail a certain amount.  Here is an image of a housed tenon I found on the internet.  This technique is used a lot in the timber frame industry.  The Greene brothers utilized it for furniture as well.


Consequently, for the top shoulders I add a heavy 1/16" to the length of the splat when scribing the shoulders.  Because of the wonders of geometry, I can use the same bevel gauge settings to scribe the shoulders.


Next I use the bandsaw to hog off most of the tenon waste material - necessary to test fit the tenons.


Now its time to cut!  I start with the bottom tenons and use my bevel gauge to set the table saw angle:


My tenon jig here is simply a large block of poplar 4 inches thick.  It has been milled on the jointer and planer and tweaked with a hand plane to get a true 90 degree surface.  Works great.


I cut the front of the tenon for all splats, then I cut the rear face of the tenon. For the rear face I creep to the desired thickness with a couple test cuts.  Since I'll be using the same setting for all the splats, I like to leave the tenon a tad heavy.  I can fine tune the fit with a shoulder plane - as it seems that no matter how hard I try to be consistent there are always small differences in thicknesses at the end.  Now, one can also cut the front shoulders at this time.  But I've decided to trim the shoulders by hand later.

Here are the splats with the tenons cut:


Now its time to start shaping.  I'll use the table saw to hog off some material.   I use my bevel gauges and reset the saw blade to the profile angle - which for the bottom is not the same as the tenon angle!


Here are the splats with the profiles partially defined by the table saw:


Now, its important that the front of the splats be consistent for a comfortable fit.  I will use a template and cut the front profile with the shaper.  I screw the template so the screws go into the waste side of the wood, bandsaw the front profile and take it to the shaper:


I do not let the cutter cut the area that was cut by the table saw.  Now, the shaper works fine for the 4 smaller splats.  What about the wide center splat?  This one is too wide for my shaper tooling.  I clamp the center splat between two of the smaller splats and start hand planing, using the smaller splat surfaces as reference edges:


I'm careful to avoid blowing out the other end since I'm going cross grain.  I had to rotate the assembly a couple times and plane from each direction to avoid blow out..  Here is the result.  Note that I did not cleanup the tops and bottom where the burn marks are (and bubinga definitely burns easy).  I still have my shoulder scribe lines down there and I do not want to lose them


Before shaping any further I need to revisit the tenons and cut them to width - as this will also tell me how to shape the front profiles of the splats:


Now its time to actually fit the tenons.  I have to use a shoulder plane to tweak a few of the tenons.  My goal here is to have a nice tight fit for the center splat.  The outer splats do not need to be so snug.  Also note that my shoulders have yet to be defined.


Now I go back to shaping.  Next I shape the back with the bandsaw.  In the photo below I support the piece with a large block of wood.


The back is still rough.  I'll clean the back up later.  Below I clamp the front profile template to the back and draw out the desired shape.  The top and bottom of the template is centered on my tenons. I then bandsaw the waste away.  I bandsaw the 4 smaller splats first.


As for the center splat I decided to clean the back before cutting the front profile - as I will be doing cross grain work which may result in some blowout at the edges.   Below I am cleaning up a side splat using a rasp, spokeshave and file.  I saved my cut off pieces.  Below the splat is resting on the cut off piece for support.  Shaping is a process that simply requires removing material to the line.  If I go beyond the line then I am either an artist or a frustrated craftsperson.  The spokeshave works pretty well.  However, there are some grain direction changes that can result in tear out with the spokeshave.  The rasp is far less susceptible to grain direction changes.  I always end with a fine file.  The file provides a surface that is easily sanded.  Bubinga, unfortunately, wants to clog up the fine file.


Below I am cleaning up the back of the center splat.  I use a shoulder plane followed with the rasp, spokeshave, and file:


Whew!  A lot of work shaping!  I finally cut the front profile of the center splat and clean the sides.  Below I am using the template to draw the shape:


For some reason I did not take a photo of the center splat shaped.  Oh well.  Now I clean up the shoulders.  Remember, the shoulders for the top will be housed so I am not too concerned about super clean edges up there.  However, the bottom will be visible so I want a good clean fit down there:


The next step is to cut the housed mortises for the splats in the crest rail.  To fit the top I install the splats and the crest rail.  Because the shoulders are about a 1/16" high the crest rail will not sit flush with the rear posts.  I then use a knife to scribe the shoulder locations on the bottom of the crest rail.  Then I use my dremel to cut out the mortise for the housed tenons for all the splats.


Unfortunately, I do not have a shot of the finished result with the splats shaped and fitted.  I'll show that in the next post where I install the 8 small tabs between the splats.