Pages

Wednesday, November 28, 2012

Green & Green Settee Part II

Just finished the 33rd annual Siskiyou Woodraft Guild show in Ashland Oregon this past Thanksgiving Weekend.  It is a great show.  We have great performers playing great music throughout the show.  This really adds to the ambiance and encourages people to linger and relax and talk.


Back to the settee.  I finished shaping the templates.  I'm careful making good templates off of the draft as these are the basis for my curves going forward.  I use sanding, files, spokeshaves, hand planes, etc to shape the templates.


I also performed final milling for most pieces. 

Crud!!! - the critical front rail did not work out.  The front rail had a big gouge almost 3/16" deep in the back from the lumber yard.  The board was thick enough so that I could joint the front side and then pretty much hog off the back side to remove the big gouge.  That part of the plan worked.  However, by taking the vast majority of the wood from one side only the board ended up warping something nasty. 


The moral of this sad story is to make sure to remove equal amounts of wood on both sides during the milling process.  Back to the lumber yard for another piece of cherry.  I will have to replace the 2 side rails as well as I want grain continuity on the sides and front (back does not matter as it is pretty much hidden). 

Wednesday, November 14, 2012

Green & Green Settee Part I


Halloween has come and gone and the pumpkin in resignation awaits his destiny on the compost heap.  In the meantime, I have started working on a commission for a Green & Green settee based on the Blacker House Arm Chair.  I built a reproduction of this arm chair earlier this year.  Given that the Green & Green aesthetic is very appealing here on the west coast, I built the arm chair with the goal of garnering interest in my skill set in that style.

This settee will be used in a Green & Green style house in the entry way.  The settee will have the main elements of the Blacker House Arm Chair but with a single cushioned back rather than the numerous wooden splats.  I'm lucky to have a pretty good upholsterer nearby who has a lot of experience with upholstering quality chairs.  I met with him to answer some questions regarding construction to satisfy his requirements for the upholstery.

Here you can see the draft on paper (almost finished):


One of the important skills I obtained at North Bennet Street School in Boston is drafting.  The draft has a front view, side view, and a plan (or top) view.  There are some important simplifications to this piece compared to the Blacker House arm chair.  Unlike the Blacker House arm chair, I will use rectangular rather than parallelogram legs and posts.  Although the side rails splay out about 100 degrees, the rear posts do not cant.  They are 90 degrees to the rear rail.  This means that the side rails meet the rear posts at a single angle and not at a compound angle.  Another simplification is the crest rail.  The arm chair's crest rail has a dramatic sweep toward the back that makes installing the ebony splines a challenge.  The crest rail on this settee does not sweep back.  I plan on using a router setup for the ebony splines this time.

My goal is to standardize as much as possible the joinery to minimize setups.  Although I'm using a mix of floating and integral tenons, where I use one or the other I attempt to use the same tenon size.  There are some exceptions, of course.

Since this is an established design I will not build a mockup but plunge right into the final product.   Based on my draft, I use carbon paper to create some templates on 1/8th inch thick birch ply.  I plan on using the shaper to shape the crest rail and the rear posts, so those templates will be used to create thicker templates appropriate for the shaper.


Given the drawing, I can now create a stock list.  I have a column for width, thickness, and length, and 2 sections for final and rough milling.  Another thing I do is calculate the board feet.  I use the rough milling section and my templates to help me choose my lumber.


We are using cherry.  The space where this piece will reside is rather dark and so the client wants a lighter wood. We definitely do not want to go too light for this piece, given the ebony accents.   I think Cherry will be a nice choice.  A neighbor has kitchen cabinets made out of cherry with faux ebony accents which looks very nice.  Below are some of the pieces rough milled.


I spent a fair amount of time attempting to get an ideal match between the part and the wood.  For example, the side rails and front rail are from a single piece of cherry, laid out so the grain flows from one side rail into the front rail and into the other side rail.  There are some other important layout considerations for the rear posts.  Since the rear posts sweep back gradually, the grain flow of the rear posts will either flow left or right with the backward sweep of the rear post.  Ideally, one wants the grain to flow up and out.  This is especially important if the rear posts have a cant angle.  Although this piece does not have a cant angle, grain flow is still important for the rear posts.

Although I had calculated the required board feet, the actual board feet purchased was definitely higher to compensate for the sapwood.  I purchased 8/4 and 6/4.  I could have used 5/4 (as the rails will be an inch thick) but the 6/4 selection was better.

Wood is like fine red wine.  Once opened, it needs to breath to acquire its ideal equilibrium with the universe around it.  I'll give it a week then begin final milling.

Thursday, May 17, 2012

BALL-N-CLAW - PART III

Claw nails! I'll let the photos speak for themselves here...


 done!

Tuesday, May 1, 2012

Green & Green Blacker House armchair - FINISHED

Here are 2 photos of the Blacker House arm chair finished and upholstered. You can view the gallery on this website to get some more closeup shots.


My wife does most of my upholstery. This time, however, I had a professional have at it given that we decided to use a sprung seat like the original. The photos unfortunately do not give the upholstery its due justice. The upholstery actually has a subtle golden hue that matches the white oak stems in the center splat. In the photos I took the upholstery is somewhat washed out. If I took this piece to a professional photographer I probably could have got better color rendering. However, I spent years with a camera as a serious amateur so I've got some sense of lighting and I think I was ably to make due in these DIY shots.  I plan on selling this piece if I can, but it is not a commission piece.  Consequently, all these costs can add up!

I simply used Old Master's tung oil varnish. I really like the stuff. I did not need to stain this piece - the mahogany is absolutely beautiful with a natural orange hue. Except for the crest rail, the chair is built out of a single board of 8/4 mahogany. The crest rail is built out of 12/4 and is probably from the same tree since I bought it at the same time as the 8/4.

I generally avoid staining - primarily because I try to let the beauty of the wood speak for itself (a euphemism for lazy?). Of course, I definitely see the benefits of staining in some situations, especially if the piece is using wood from different boards from a different tree that don't really match.  White oak can be this way. There may be some laziness to this belief, but also a realization that I have not mastered the art of staining - and it is indeed a skill! I also firmly believe in spending a LOT of time in surface preparation prior to the finish - carefully sanding through all the grits but not over sanding so the piece loses definition. Mass produced pieces are generally over-sanded blobs of wood stained a very dark color to disguise the lousy surface preparation with the use of "aging" techniques to disguise poor joinery and assembly. But we are not that way, are we!

Another thing.  We hear about the "hand rubbed finish".  With oils and oil/varnish blends there is a tendency for the finish to bleed, creating tiny shiny spots if left as is.  I think the term "hand rubbing" has to do with the fact that one needs to monitor the piece for a certain amount of time and "rub" out those shiny blemishes.  These wipe on oil blends, while technically easy, or not foolproof without proper procedure.  Beyond dealing with bleeding, I don't think rubbing adds any value.

Friday, April 27, 2012

BALL-N-CLAW - PART II

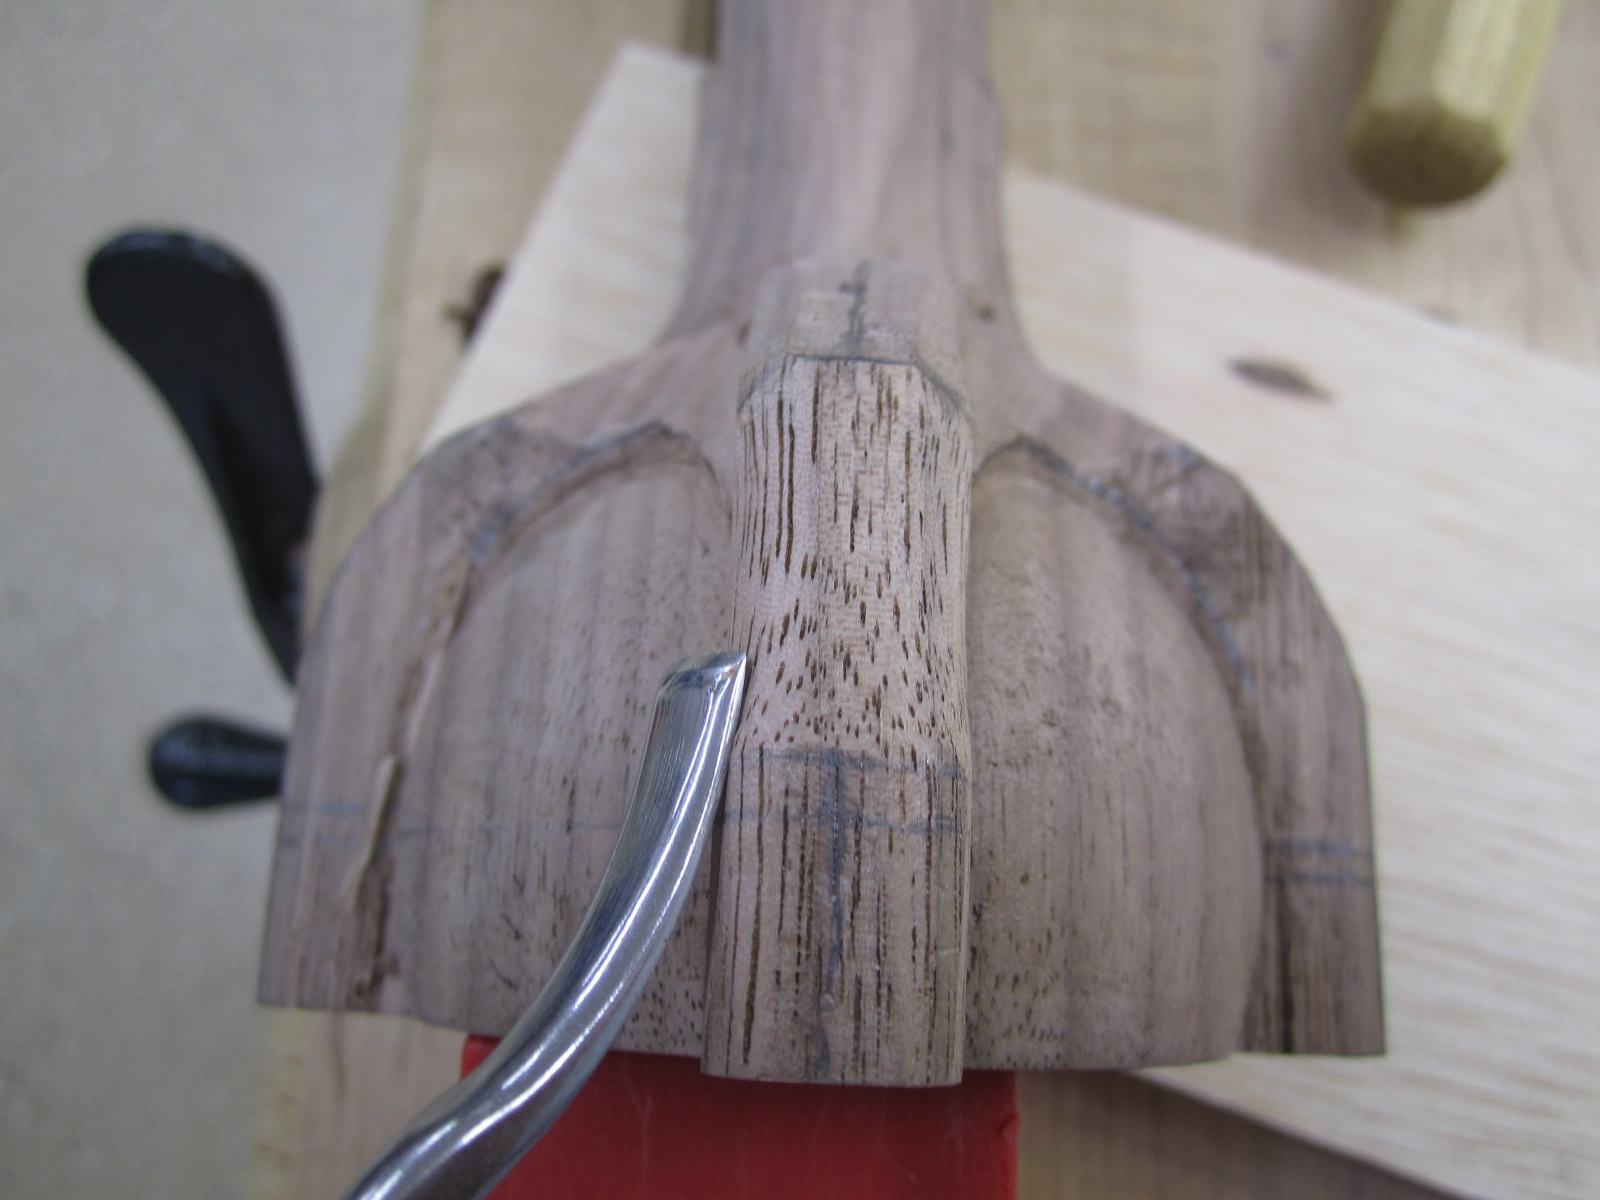
Time to work the toes.  Imagine the toes as 3/8 inch cylinders...


Consequently, we will define chamfer lines that will begin the process of turning them toes into cylinders.  Then we chisel to those lines.  I'm actually following the 7-5 rule to turn a square corner into a circular corner.  The 7-5 rule is pretty cool and is definitely worth knowing.  Perhaps I'll post something on the 7-5 rule later.


In the photo above, we see the top knuckle and just below that a pencil line.  We will lower the top knuckles of the 2 side toes to that lower pencil line.  However, for the center toe, we will raise the top knuckle.


The visual impact is that the side knuckles are lower than the center knuckles - a very nice touch. Before changing the top knuckle locations we will remove most of the wood in the webbing area to make these modifications easier.


It is difficult to tell, but below we can now see the new top knuckle locations.  As we define the toes these height differences will become more pronounced.  (The photo below is all caddy wampus - whoever took that photo must have just enjoyed a good beer).


We'll start with the back toe.  Unlike the front and side toes, the back toe has no knuckles.  Below I've rounded the back toe and have started defining the transition to the ball.  There are some grain direction changes so one has to go slow and watch the grain very carefully here.  In the background you can see a sample ball-n-claw I carved while at North Bennet Street School for a reference piece.


Front toe next...

 After chamfering and rounding, I begin to define the "scoop" between the knuckles - going across the grain when necessary to avoid grain reversal issues (and tear out).  When going across the grain, I don't just push the chisel - I push and slice back and forth simultaneously for a nice cut.  I think that is a 3-20 gouge below.  I'm also undercutting where the toes meet the ball to add shadow and visual impact.


I like the knuckles sharply defined rather than rounded.  For the side toes, we do the same thing.  However, we need to work a bit more in defining the transitions towards the ankles and the ball.  For the transition of the ankle to the cabriole leg I use a chisel, rasp, spokeshave, and a file.  A file smooths everything out and also prepares the surface for sanding.  Later, when I begin sanding, 120 grit sandpaper will easily remove the file marks.


I also scoop out the knuckles like I did with the front toes.


In the end we have the following.  I have also defined the webbing a bit more with about a 1/16" lip above the ball.  An upside down V is a nice goal for the webbing.


Next are the nails.

Thursday, April 12, 2012

BALL-N-CLAW - PART I

I'll post a final photo of the Blacker House armchair once it is upholstered - which will be soon.

In the meantime, here is another project that I am working on for an upcoming woodworking show in Portland, Oregon on May 4th - 6th at the convention center.  It is called the "Gathering of the Guilds".  Woodworking is just a small part of the show.  The project is a ball-n-claw footstool.   I think the west coast aesthetic is different than the east coast.  The east coast would be interested in the more traditional colonial style.  The west coast aesthetic is more modern and asian.  Consequently, I will keep it simple and only carve the claws - no fancy leaf or shell carvings.   I will most likely use either white or black leather for a more modern feel.   One does not see too many nice representations of colonial features on the west coast.  I am looking at blending traditional and modern with this stool.

Here is the footstool with the legs shaped on the bandsaw and the joinery finished.  I am using some beautiful walnut that I purchased back east and hauled around with me.  I sincerely believe the east coasters keep the best for themselves before shipping the second hand stuff out to the west coast.  And most of that which is shipped is surfaced, which sucks as we lose a lot of wood for boards that are no straighter than the unsurfaced stuff.


I don't simply freehand the cabriole leg shapes - the shape is based on what I learned at North Bennet Street School in Boston and there are a lot of layout lines for reference.  The school in turn used a style from a specific cabinet maker in Philadelphia named James Gillingham (~1765-1770).  Philadelphia had a keen eye on style and produced some of the most beautiful pieces during the colonial days.


Them notches you see below define the top locations of the ball vis-a-vis the claw.


I use a small scraper with a curve that matches the ball to clean up the chisel marks to give a nice surface on the ball.


Ready for the toes next.

Monday, March 12, 2012

Green & Green Blacker House armchair - part X

Bracket details - and chair is finally ready for finishing!

There are 4 bracket details under the seat rails.  After building this chair I realize now that some things should have been done before the primary glue-up.   Fortunately, I did fit the bracket details before glue-up.  They were roughly shaped and fitted into a mortise in the front legs and fitted with 2 screws into the seat rail.  Consequently, the exercise going forward consists primarily of final shaping.  The hard part, namely the joinery, is done.  The pictures below show what has already been done.  If I build this chair again I may try using a floating round tenon to join the bracket to the leg rather than the square mortise as shown below.


Here we go with the final shaping...


Below I am using a very fine Japanese crosscut saw which I purchased from the Japan Woodworker years ago.  Works great for small and precise cuts.


Note the curved and rounded over lip - a subtle but important detail I think.


I had sanded the entire chair up to 220 grit before installing the plugs.  I only had to do some spot sanding at this time.  The chair is sanded and ready for finishing!


Below is the original for comparison.


The first thing I notice is that my brackets are a bit heavy.  I know that my front splines are heavy (due to a tool malfunction described in an earlier post).  I think my square negative spaces in the main center splat can be a bit larger.  However, I'm pretty satisfied with the results.  This is a tough chair to build!  The fact that much of the chair was shaped by hand will definitely lend it a unique quality which isn't necessarily bad.